Search

Applied Biosystems™
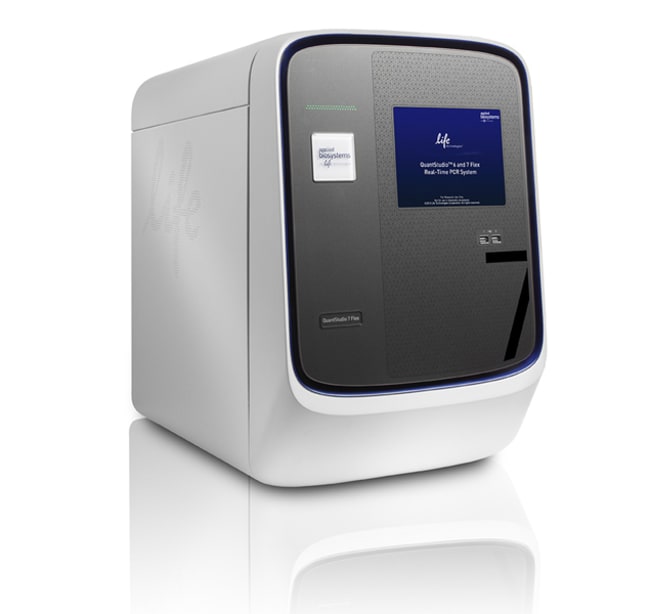
QuantStudio™ 7 Flex Real-Time PCR System, 384-well, desktop
Applied Biosystems® QuantStudio™ 7 Flex Real-Time PCR System은 멀티플렉싱 기능과 교체 가능한 블록 형식을 통해 광범위한 real-time PCR 기반 어플리케이션을자세히 알아보기
| 카탈로그 번호 | 수량 |
|---|---|
| 4485701 | 1 system |
카탈로그 번호 4485701
제품 가격(KRW)
-
수량:
1 system
Applied Biosystems® QuantStudio™ 7 Flex Real-Time PCR System은 멀티플렉싱 기능과 교체 가능한 블록 형식을 통해 광범위한 real-time PCR 기반 어플리케이션을 지원함으로써 보다 우수한 연구 성과를 낼 수 있도록 해줍니다. 단순한 workflow, 직관적인 소프트웨어, 자동화 기능, 터치스크린 인터페이스를 지원하는 QuantStudio™ 7 Flex 시스템은 웰 간 및 기기 간 변동을 최소화함으로써 우수한 재현성을 제공합니다.
>> QuantStudio™ 7 소프트웨어의 90일 평가판 다운로드
QuantStudio™ 7 Flex 시스템은 96-well, 96-well Fast, 384-well 또는 TaqMan® 어레이 카드 블록 교환이 가능합니다. 이 시스템에는 한 가지 블록 유형(이 경우에 384-well 블록)이 제공되며, 다른 블록 유형은 별도로 구입할 수 있습니다. 또한, 이 시스템이 높은 처리량의 workflow를 지원할 수 있도록 Twister® Robot Automation Accessory를 사용할 수도 있습니다. TaqMan® 어레이 카드 또는 자동화를 지원하지 않는 고가 시스템(나중에 지원하도록 업그레이드할 수도 있음)을 확인하려면, 당사의 QuantStudio™ 6 Flex 시스템을 참조하십시오. 최고의 활용성이 필요하다면, TaqMan® OpenArray® 플레이트를 수용하는 QuantStudio™ 12K Flex 시스템이 가장 적합합니다.
QuantStudio™ 7 Flex Real-Time PCR System의 특징:
• 네 가지 블록 유형을 통한 어플리케이션 활용도 향상
• 유전자 발현, 유전적 변이, 유전자 조절 또는 단백질 발현 실험을 위한 800만개 이상의 TaqMan® 분석에서 사용 가능
• Applied Biosystems® 기기 안정성 및 정확성과 QuantStudio™ 플랫폼의 지능형 설계가 결합된 제품
• 사용이 쉬운 소프트웨어, 즉시 반응하는 터치스크린, 다른 장비가 필요하지 않은 간편한 블록 교환
많은 작업도 더욱 빠르게 완료
TaqMan® Array 384-well 마이크로유체(microfluidic) 카드를 사용해 수백 개의 real-time PCR 반응을 손쉽게 실행합니다. 또한, Twister® Robot Automation Accessory(별도로 구입 가능)와 통합되면, QuantStudio™ 7 Flex 시스템은 처리량 기능을 극대화해 줍니다.
높은 어플리케이션 활용도
유전자 발현, 유전적 변이, 유전자 조절, HRM(High Resolution Melt), Protein Thermal Shift™ 실험을 포함한 광범위한 어플리케이션에서 단순한 workflow, 신뢰할 수 있는 분석과 시약, 여러 형식, 그리고 직관적인 소프트웨어를 사용할 수 있습니다.
신뢰할 수 있는 결과
6개의 분리된 여기 및 방출 필터 채널과 함께 멀티플렉싱과 화학적 융통성을 극대화해 주는 21개 필터 조합을 사용한 OptiFlex™ 시스템을 통해 웰 간 및 기기 간 데이터 정확성이 보장됩니다.
민감한 데이터 분석
Single-Plex 반응에서 1.5배만큼 적은 표적 양의 변화를 검출하고 10 log의 선형 동적 범위를 확보합니다.
For Research Use Only. Not for use in diagnostic procedures.
사양
디스플레이 유형Touchscreen
용도(장비)QuantStudio™
형식384-well Plate
제품라인QuantStudio
수량1 system
블록 형식Interchangeable
Unit SizeEach
구성 및 보관
Desktop Computer