Imaging flow cytometry is an analytical technique that integrates the quantitative capabilities of flow cytometry with the spatial detail of microscopy, enabling simultaneous collection of high-throughput cellular measurements and detailed morphological images.
This dual-modality approach supports a range of applications—from immune profiling to cell cycle analysis—where both population-level statistics and single-cell visual information are critical.
As the use of image data in flow cytometry expands, so does the need for accurate image annotation and classification.
Invitrogen™ Attune™ CytPix™ flow cytometers incorporate integrated brightfield imaging alongside conventional flow cytometry measurements, enabling users to capture and analyze cellular images in parallel with fluorescence and scatter data. This capability supports downstream image-based analyses such as morphological annotation, particle counting, and user-driven model training within compatible software environments.
With the Attune CytPix Software v 7.1 release, users can now train their own AI models using built-in model training tools. The software enables an intuitive, step-by-step guide to perform the training, but some may still be uncertain of the biological decision points behind model retraining. This article aims to outline steps and provide guidance for determining if and how to train a new model with different sample types.
Table of contents
- Imaging flow cytometry: AI model training overview
- Should you train a new AI image annotation model for flow cytometry analysis?
- Which base model should you choose for training a custom AI model for imaging flow cytometry?
- How many samples or images should you use when training a custom image annotation model?
- What decisions need to be made during AI model training in the Attune software wizard?
- How do we evaluate a user-trained image annotation model for flow cytometry?
- Conclusions
- More imaging flow cytometry resources
Imaging flow cytometry: AI model training overview
This guide will walk through several real-life case studies involving image model training for flow cytometry. The training process follows five general steps:
- Determine if a new model is needed for the research question or sample type.
- Choose a base model.
- Choose the representative training set sample(s).
- Complete the software-guided AI training process.
- Evaluate the newly trained model.

Should you train a new AI image annotation model for flow cytometry analysis?
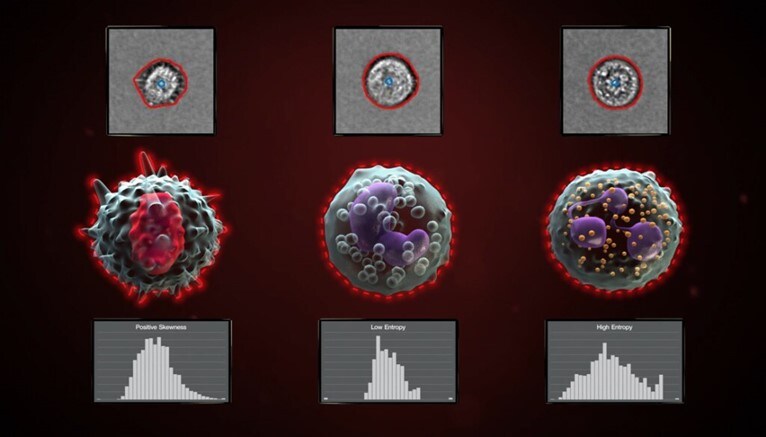
The Attune software comes with several pre-validated models (vendor supplied or VS models). These models have been trained on human leukocytes and beads with robust validation across a wide range of sample types. Some sample morphologies may be too different from the training data, however, leading to annotation errors. To determine if a model suits your particle type, you can process a sample with an existing model and evaluate mask fit and count accuracy using the Image View Gallery. During model evaluation, take note of mask fit (for intensity and shape measurement accuracy) and centroid count (particle count and clump index accuracy).
You should decide the level of error you are comfortable with for your research needs ahead of this evaluation. In early phases of data exploration, for example, you may be willing to tolerate some errors in favor of speed. When measuring cell size or parameter shifts between populations, you may need a more stringent, accurate approach.
The galleries in Figure 1 demonstrate model performance after using the VS half resolution cell model on several cell types. Our research aims in this example differed between mammalian, insect, and fungal cell types:
- Murine peritoneal exudate cells (PEC) – gate cleanup for immunophenotyping
- Drosophila melanogaster Meigen cells – preliminary exploration of normal cell ranges
Schizosaccharomyces pombe Lindner cells – quantitative comparison of the impact of two culture conditions
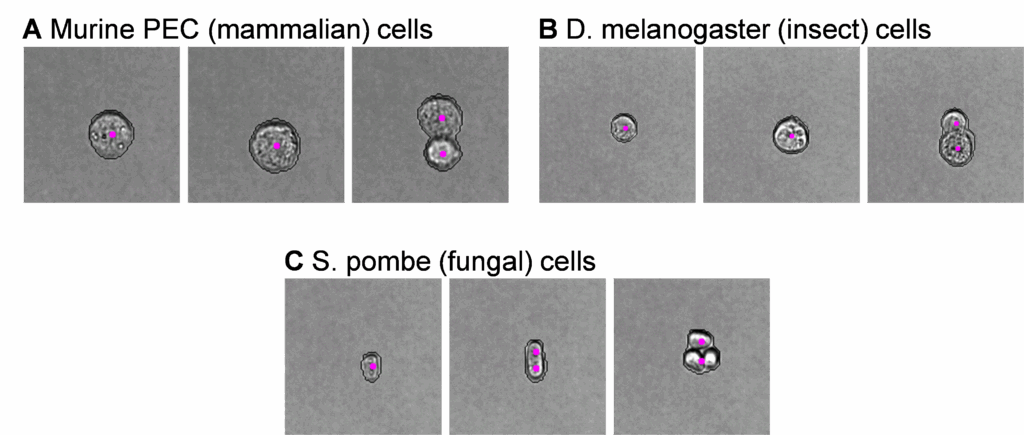
The adequacy of model performance will depend on your desired outcomes. For the samples shown above, we found unacceptable counting errors for our research goals with S. pombe, where several elongated singlets characteristic of this species were incorrectly annotated as doublets (Figure 1C). Conversely, both mammalian (Figure 1A) and insect (Figure 1B) cells had user-acceptable annotations, and no model retraining was necessary to meet our research needs.
Which base model should you choose for training a custom AI model for imaging flow cytometry?
You can train a new model by starting with a VS or shared user-trained model. Follow the instructions outlined in Step 1 of this guide, processing your sample with your candidate model and scanning the Image View Gallery for acceptable errors. You can reprocess the same sample several times, so you can get started in your comparison even with limited starting data.
If you are using a VS model, you should decide if a half resolution or full resolution model better fits your needs. We suggest considering the fastest, half resolution models first and switching to full resolution if your initial evaluation reveals errors.
In Figure 2 below, we evaluated the S. pombe sample from Figure 1 with the VS full-resolution cell model after finding counting errors in the VS half-resolution model.

For this S. pombe sample, both the full- and half-resolution models yield the undesired counting error on the elongated single cells (middle panes, Figure 2A and 2B) but the full resolution model did have tighter mask fit – valuable for separating subpopulations with size, shape and intensity parameters. This separation would be valuable for our final research goals since we are comparing potentially subtle changes between two culture conditions.
With this research goal in mind, we decided to use full resolution cell model as the basis of our user driven training (UDT) efforts.
How many samples or images should you use when training a custom image annotation model?
In the Attune CytPix Software v 7.1, you will choose a training sample (or set of samples) from which recommended training images will be selected. You should define the number of images you wish to preview (between 50 and 1000, with a default value of 200). You should include a larger number of images (>200) for highly heterogenous sample sets, since this increases the availability of images representative of each phenotype of interest.
From the training sample(s), the software will automatically choose images with 70% random morphologies and 30% variable morphologies. These will become candidate images for annotation – thus, it is important that we match our training sample(s) to our research samples. Here, we included training samples from each of our culture conditions (Figure 3). If a separate training sample is not available, you can use your research sample for both training and processing.
Note: The AI algorithm is unaware of the cell type used. Model retraining should focus on particle features, not particle type. Thus, if sufficient training images are not available for your cell type of interest, cells with similar morphological features (shape, intensity, etc.) can also be added when performing UDT.

Because we had two culture conditions we wanted to evaluate in the final sample analysis, we included one training sample from each condition to select images from during model retraining (Figure 3).
To summarize our last few steps, we:
- Established that we needed to retrain an image analysis model
- Chose a base model
- Chose training samples
At that point, we were ready to follow the software wizard guidance to perform model retraining.
What decisions need to be made during AI model training in the Attune software wizard?
A step-by-step model training wizard will guide you through the process of model training in the Attune CytPix Software. However, you may want to consider a few biology-driven decision points during the training process. We discuss several of these scenarios below using the same S. pombe dataset referenced in Figures 1-3.
Size cutoff
The default and recommended size cutoff for UDT models is a 5 µm diameter. Our example target cells all had at least one axis of ≥5 µm, so no adjustment was needed.
Note: To avoid annotating background or small debris we highly recommend not reducing the size cutoff unless necessary for your sample type.
Number of images to annotate and how to annotate them
You’ll need to annotate a minimum of 10 images to complete model training. Samples that are most similar to the base model’s training sets may take more images to make drastic changes in model performance.
While our S. pombe samples had generally good model fit already (indicating similarity to base model annotation scheme), we attempted to train with only 10 images to start.
You can pause model training at any point to add additional images, so it is reasonable to start with only a few images and add more as needed.
Note: Many of the samples we have evaluated used ~20 annotations by the end of training. It is reasonable to add 20 or more annotations at the very beginning of training to reduce overall training time and user check-in requirements.
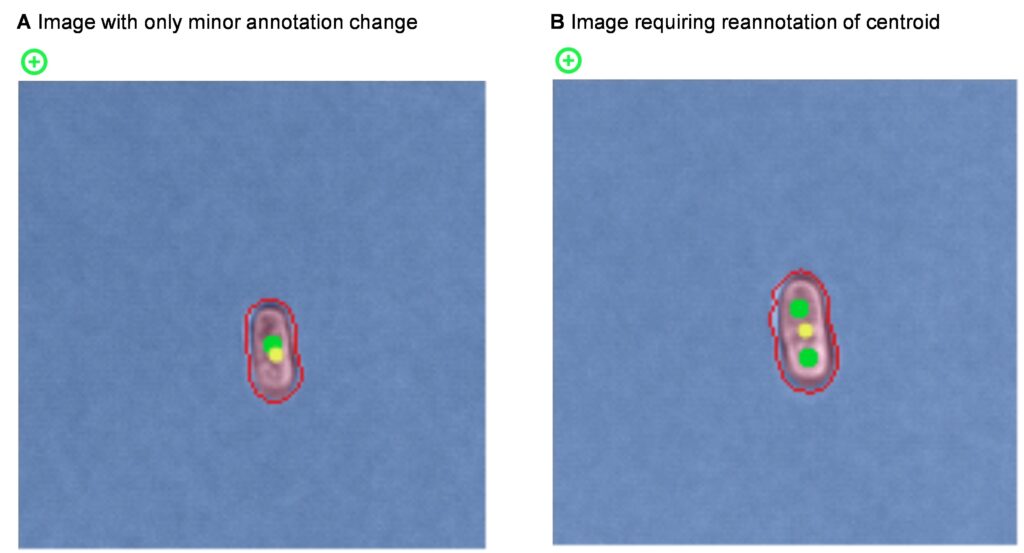
You can pre-annotate many images with acceptable masks and centroids. You can also add these pre-annotated images with any desired minor adjustments to auto-annotation later without repositioning suggested centroid placement. We outline an example of this along with an image requiring more substantial user change in Figure 4. Both image types are valuable to include in the training set – model retraining is as much about reinforcing quality annotations as it is about correcting faulty ones.
Note: Consistent annotations reduce model training requirements and improve accuracy. If you choose to pause annotations and resume later, we recommend briefly reviewing your previous annotations to ensure you have applied a similar level of stringency to mask annotations and centroid positions.
For greatest counting accuracy, it is also very important to place centroids in the center of each cell or particle. We remember this with the tongue-twister “cellularly centered centroids”.
Some samples present the unique challenge of indistinguishable single cell characteristics, both to the model and to the user. If these events are abundant in your sample, using methods other than particle count may be valuable in distinguishing events of interest.
Number of epochs
It is wise to check in on training periodically, especially if you are new to model training. Here, we paused after 100 epochs and viewed the updated gallery because we were uncertain about the number of images to add for this sample type. In this training set, each epoch runs in ~3-5 seconds, so we would expect 100 epochs to finish in under 10 minutes. The timing of epochs is dependent on several factors, including the number of annotations added and the PC’s computing power.
While observing the training during the first 100 epochs, we noted that an image representative of the problematic particles (elongated single cells) was switching back and forth between singlet and doublet annotation. There were also several dips in the training accuracy (TA) and validation accuracy (VA) learning curves. These both indicate confusion of the model which is compounded by insufficient or inconsistent training data. This is normal and expected in early epochs, especially with so few images added.
To correct this and speed up model resolution, we added an additional four images to the training set and the training continued for another 50 epochs. By epoch 150, the gallery annotations and the learning curves had stabilized, with a tight correlation between TA and VA values. At this point, we ended training to finalize the model. The progression of this training is shown with several screenshots in Figure 5.
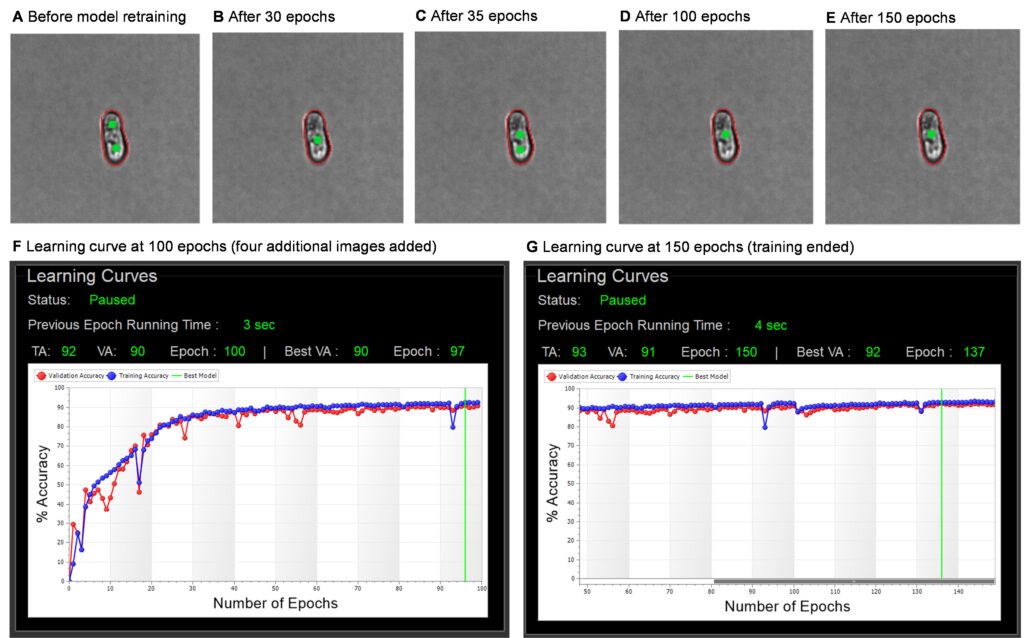
Even with the additional four images, the total training time was under 30 minutes, with only ~5 minutes of hands-on time.
The next step involves seeing how our newly trained model performs on our samples.
How do we evaluate a user-trained image annotation model for flow cytometry?
Following the same procedure outlined in step 1, we evaluated our user-trained model (Figure 6) across several samples of interest.

From this evaluation, we confirmed that our user-trained model did indeed improve cell counts on the elongated events of interest. In addition, the mask goodness of fit for small singlets (Figure 6B, left pane) and cell counts in more complex events (Figure 6B, right pane) were also improved.
Multiple samples can now be processed with this model, using both traditional flow cytometry parameters and image-derived data to quantify and explore this sample type. The model may also be shared with research collaborators to process their own samples or use as a starting point to additional user trained models.
Conclusions
User driven training in the Attune CytPix Software can rapidly improve annotation accuracy and data integrity. The software tools help provide step-by-step guidance on performing model training, while a thorough understanding of the research needs guides the sample-specific decision points discussed here.
More imaging flow cytometry resources
- Webinar: Imaging flow cytometry and autofluorescence for label-free sorting and quantitative phenotyping of morphologically diverse, unculturable bacterial pathogens (Dr. Daniel Vocelle, Director of Flow Cytometry Shared Resources, St. Jude Children’s Research Hospital)
- Technology: Attune CytPix Flow Cytometer
- Software Download: Attune Cytometric Software (see 7.1 release notes)
- Learning Center: Flow Cytometry
- Blog: AI is shifting the paradigm in flow cytometry
##
For Research Use Only. Not for use in diagnostic procedures.
© 2025 Thermo Fisher Scientific Inc. All rights reserved. All trademarks are the property of Thermo Fisher Scientific and its subsidiaries unless otherwise specified.
12 Women Scientists Who Shaped STEM History
Throughout STEM history, the contributions of women scientis... Dana D'Amico
Read More
Thermo Fisher Scientific Partners with AIM Biotech on Development of Microphysiological Systems
The adoption of New Approach Methodologies (NAMs) in drug di...
Read More
5 Solutions for Overcoming Research Challenges in Vaccine Development
What are the main challenges in vaccine development? The mai...
Read More
Deoxyribonuclease I in Advanced Molecular Biology Applications
Deoxyribonuclease I (DNase I) is a vital enzyme that acts as...
Read More
Leave a Reply