This guide provides an overview of plasmid prep protocols, highlighting essential materials and steps to achieve optimal plasmid yield and purity.
From manual methods to automated solutions, learn how to streamline your plasmid purification workflow for quality downstream results in biotech research applications.
Table of contents
What are plasmids and how are they used in biotech research?
A plasmid is a small, circular piece of DNA that exists independently of the chromosomal DNA. While primarily found in bacteria, plasmids can also be present in other organisms. Their ability to replicate independently makes them invaluable tools for genetic manipulation.
Plasmid DNA has numerous applications in biotechnology, including:
- RNA-based vaccine development: Plasmids can be used as a template to generate mRNA for vaccines. By inserting a gene of interest into a plasmid and amplifying it, researchers can produce large quantities of mRNA. This mRNA can then be purified and used as a vaccine to target specific conditions.
- Cell and gene therapy: In this context, plasmid DNA serves to repair genes to correct genetic challenges.
- Viral vector production: Plasmids function to create viral vectors, which deliver genetic instructions into cells.
- Genetic engineering: Plasmids are used to manipulate genetic makeup in organisms, such as creating pest-resistant crops.
- Protein production: Plasmids can be engineered to produce proteins for therapeutic purposes.
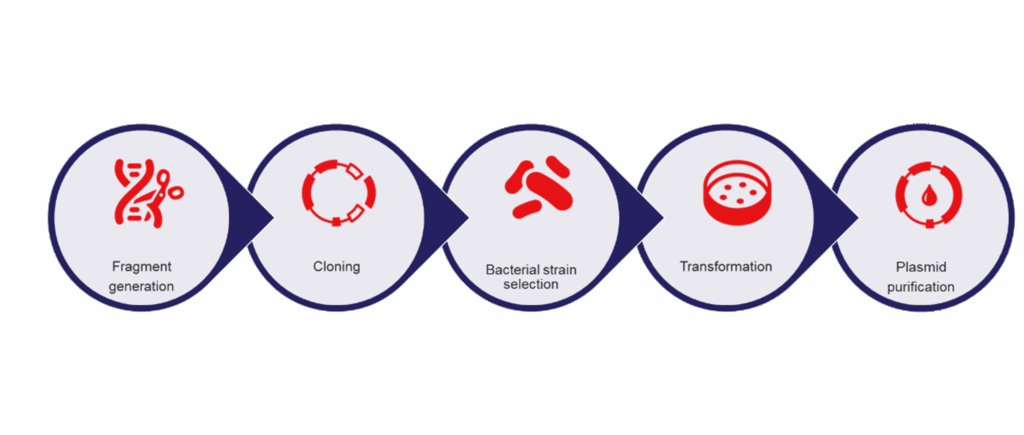
Understanding plasmid cloning
Before getting into plasmid purification, it’s essential to understand the standard cloning workflow that precedes it.
- Plasmid design: The first step involves choosing the right vector backbone, insert size, and cloning sites based on the downstream application.
- Selection of an appropriate bacterial strain: Various bacterial strains serve different purposes. For routine cloning, strains with high transformation efficiency are typically used. Specialized purposes may require genetically engineered strains for enhanced plasmid stability. Click or tap here to enter text.
- Transformation: The next step introduces the plasmid into competent bacterial cells for plasmid replication. Click or tap here to enter text.
- Colony screening: After transformation, colonies are screened and plasmids are purified for downstream applications.
Factors that influence plasmid prep yield and purity
Several factors impact plasmid yield and purity of the purified plasmid DNA:
- Plasmid size and design: The choice of vector backbone, insert size, and DNA insert is important for plasmid yield.
- Choice of bacterial strain: Different strains offer varying benefits, such as enhanced plasmid stability or higher transformation efficiency.
- Culture conditions: Optimal growth conditions, including temperature, pH, oxygen levels, time for growth, and shaking speed, are essential for high plasmid yields.
- Antibiotic use: The correct antibiotic concentration helps maintain selective pressure, which is crucial for plasmid retention.
- Origin of replication: The origin of replication (ori) determines the plasmid’s copy number, influencing yield. High-copy plasmids like pUC produce many copies, while low-copy plasmids like pBR322 produce fewer copies.
Materials used in plasmid prep
Researchers today have options ranging from a traditional manual plasmid purification workflow to ready-made kits or hands-off automated systems.
Manual processing tools
Culture media
Several different types of media can be used to grow the overnight bacterial culture for plasmid purification.
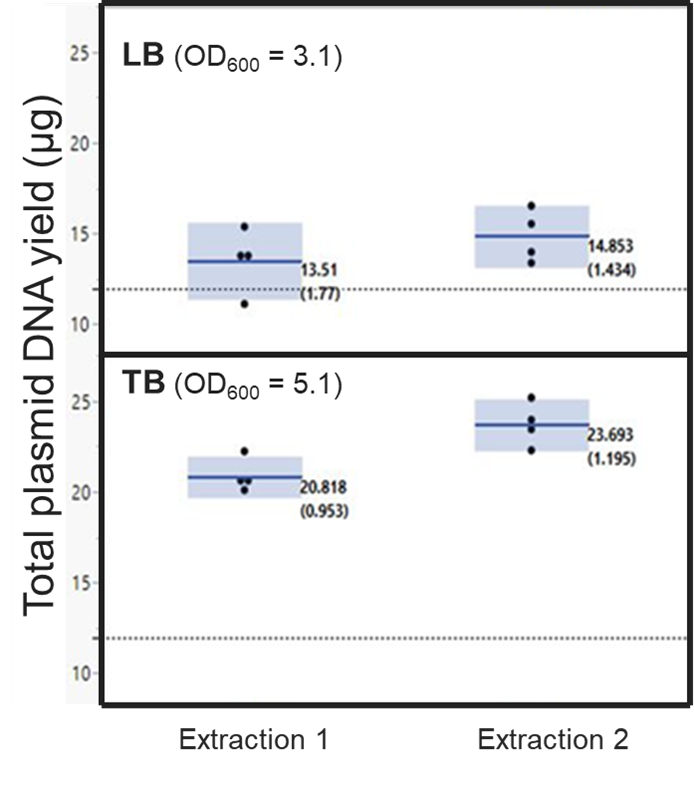
- Gibco™ Lysogeny Broth (LB) is the most popular medium for the growth of bacterial culture. LB media is formulated with peptone, yeast extract, and NaCl. Based on the concentration of NaCl, the LB media is further classified as LB – Miller, LB – Lennox and LB – low salt.
- Gibco™ Terrific Broth (TB) is a nutrient-rich medium with a higher concentration of peptones and yeast extract, offering abundant sources of nitrogen, vitamins, and minerals. TB media enhances bacterial growth and supports a higher density of bacterial culture, resulting in a greater number of cells in a shorter time.
- 2X YT Medium™ is formulated with double the concentration (2X) of yeast extract compared to typical LB medium for the growth and maintenance of higher cell density for a longer growth period.
Buffers and solutions
Several buffers and reagents are needed to resuspend the bacterial pellet, lyse the bacterial cells, neutralize the solution to precipitate the DNA, wash buffer to get rid of impurities, and buffer to elute the purified plasmid DNA.
Additional lab equipment
Centrifuge, vacuum filtration units, or gravity flow equipment are generally needed to purify plasmid DNA with hands-on manual steps.
Plasmid DNA-binding surface
Silica or anion exchange membrane, resins, magnetic beads or other plasmid DNA-binding matrices are necessary.
Spectrophotometer
A Thermo Scientific NanoDrop, plate reader, or other spectrophotometric instrument is used for measuring DNA concentration and purity.
Agarose gel electrophoresis and imaging
Agarose gel electrophoresis tools are used for checking the integrity of the plasmid DNA.
Tubes
In plasmid purification, several types of tubes that hold different volumes of reagents and buffers are used at several steps, including microcentrifuge tubes, membrane-packed column tubes, clarification filter tubes, and collection tubes. All the required tubes are provided with the plasmid purification kits. These tubes are typically made of durable and leaching-resistant materials like polypropylene or polyethylene. These tubes are also available as endotoxin-free for higher purity requirements.
By following these steps and using the appropriate materials, you can effectively purify plasmid DNA for various downstream applications.
Plasmid prep kits
Traditional column-based methods offer researchers the flexibility to choose from small-scale plasmid isolation to commercial scale-up. The choice of manual purification kits is based on the lab’s requirement to process the starting culture volume for the plasmid yield required for downstream applications.
Below is a summary of the different column-based solutions for various starting input culture volumes and expected plasmid yields:
Miniprep (1-5mL; up to 40µg)
- Invitrogen™ PureLink™ Quick Plasmid Miniprep Kit
- PureLink HiPure Plasmid Miniprep Kit
- Thermo Scientific™ GeneJET Plasmid Miniprep Kit
Midiprep (25-100mL; up to 400µg)
- PureLink HiPure Plasmid Midiprep Kit
- PureLink HiPure Plasmid Filter Midiprep Kit
- GeneJET Plasmid Midiprep Kit
Maxiprep (100-500mL; up to 1.5mg)
- PureLink HiPure Plasmid Maxiprep Kit
- PureLink Expi Endotoxin-Free Maxi Plasmid Purification Kit
- GeneJET Plasmid Maxiprep Kit
Megaprep (500ml -2.5L; up to 5mg)
- PureLink HiPure Expi Plasmid Megaprep Kit
- PureLink Expi Endotoxin-Free Mega Plasmid Purification Kit
Gigaprep (2.5-5L; up to 15mg)
- PureLink Expi Endotoxin-Free Giga Plasmid Purification Kit
- PureLink HiPure Expi Plasmid Gigaprep Kit
Plasmid prep automation
Recent automation-based plasmid isolation technology can help improve efficiency compared to manual methods.
The Applied Biosystems™ MagMAX™ ProHT NoSpin Miniprep plasmid isolation kit, for example, eliminates the centrifugation step completely in harvesting bacterial cells. The kit is a dual paramagnetic bead-based method where one set of magnetic beads binds to bacteria. A second set of magnetic beads binds to the plasmid DNA to elute higher quality plasmid DNA.
The Thermo Scientific™ KingFisher™ PlasmidPro Maxi Processer is another tool that allows researchers to walk away while the system automates nearly the entire purification process – going from culture to transfection-grade purified plasmid DNA in under 75 minutes and only 5 minutes of hands-on time.
Key steps in plasmid prep protocols
Plasmid purification can be a labor-intensive and time-consuming manual process.
Manual plasmid isolation and purification techniques typically involve the following steps:
1. Preparing an overnight bacterial culture.
This step cultures a bacterial population for harvesting isolated plasmid DNA.
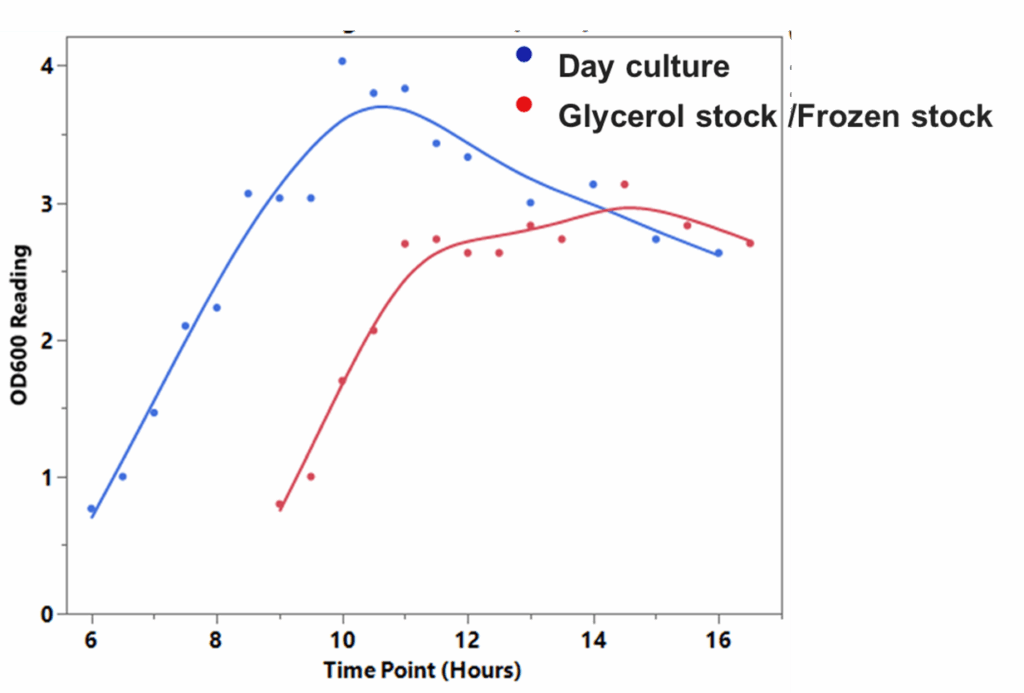
- Inoculation: Prepare a starter culture by inoculating a single bacterial colony into a small volume of liquid culture medium and growing it for 4-8 hours at 37°C and 225 rpm. Use this starter to inoculate an overnight culture at a larger volume for plasmid purification.
- Growth: Incubate the culture under optimal conditions (usually shaking at 37°C) until it reaches the desired cell density (typically measured as OD600).
Tips for a successful starter culture: Using a starter culture from a single colony result in optimal growth conditions compared to starting an overnight bacterial culture directly from a frozen stock. Cells in a starter culture are actively growing and are in their exponential phase, which is ideal for initiating new cultures.
By contrast, cells from frozen stocks may have reduced viability due to the stress of freezing and thawing – leading to slower growth rates and longer lag phases. High-copy plasmids typically require 12-16 hours of growth, while low-copy plasmids may need 20 hours or more.
2. Harvesting bacterial cells
This step gathers bacteria cells from solution, forming a pellet for further analysis.
- Centrifugation: Collect the bacterial cells by centrifuging the culture and discarding the supernatant.
3. Triggering cell lysis
The goal of this step is to dissolve the bacteria and release their contents, including genetic plasmid material, into solution for further purification.
- Resuspension: Resuspend the cell pellet in a resuspension buffer (often containing Tris-HCl, EDTA, and RNase A).
- Lysis: Add a lysis buffer (usually containing NaOH and SDS) to break open the cells and release the plasmid DNA.
- Neutralization: Neutralize the solution with a neutralization buffer (often containing potassium acetate or acetic acid) to precipitate the cellular debris while keeping the plasmid DNA in solution.
4. Clearing lysate
Clear the lysate by centrifuging or filtering to remove the precipitated debris and other impurities.
5. Binding plasmid DNA
Pass the cleared lysate through a silica column or other DNA-binding matrix. The plasmid DNA binds to the column while impurities flow through.
6. Washing
Wash the column with one or more wash buffers (often containing ethanol and salts) to remove any remaining contaminants.
7. Eluting
Elute the plasmid DNA from the column using a low-salt buffer (typically containing Tris-HCl or water).
8. Performing a concentration and purity check
The last step for plasmid purification is a quality check for concentration and purity.
- Ethanol precipitation (optional): Concentrate the DNA by ethanol precipitation if necessary.
- Quality Control: Measure the concentration and purity of the plasmid DNA using spectrophotometry (e.g., A260/A280 ratio) and run an agarose gel to check for integrity.
More plasmid prep resources
- Learn: understanding plasmid purity
- Explore & buy: plasmid isolation
- Automate: Kingfisher PlasmidPro Maxi processor
- Explore & buy: Plasmid miniprep kits midiprep kits, and maxiprep kits
- Design: Plasmid Purification Selection Tool
- Download eBook: Techniques for Manual & Automated Plasmid Purification Solutions
##
For Research Use Only. Not for use in diagnostic procedures.
© 2025 Thermo Fisher Scientific Inc. All rights reserved. All trademarks are the property of Thermo Fisher Scientific and its subsidiaries unless otherwise specified.

12 Women Scientists Who Shaped STEM History
Throughout STEM history, the contributions of women scientis... Dana D'Amico
Read More
Thermo Fisher Scientific Partners with AIM Biotech on Development of Microphysiological Systems
The adoption of New Approach Methodologies (NAMs) in drug di...
Read More
5 Solutions for Overcoming Research Challenges in Vaccine Development
What are the main challenges in vaccine development? The mai...
Read More
Deoxyribonuclease I in Advanced Molecular Biology Applications
Deoxyribonuclease I (DNase I) is a vital enzyme that acts as...
Read More
Leave a Reply